Shrinking Bloated CloudFormation Templates With Nested Stacks
Using A Nested Stack to Create an API Gateway Resource for an S3 Bucket -- And Another, And Another, etc.
by JamesQMurphy | October 26, 2019
For the past few weeks, I've been working on implementing basic login functionality to the site. It's coming along, but it's not quite feature complete, so I decided to take a break from that and work on the aesthetics of the site. That's definitely not my forte -- I'm a lousy web designer -- but I needed something to give my site just a little bit of personalization. So I added a home screen banner, a picture of me, and the requisite social media links. It won't win any awards, but it looks much better than it did before.
However, having the page load in a totally clean browser was painful to watch, especially if the AWS Lambda function was "cold"; i.e., there were no currently running instances. The cold start problem is something that can be addressed, but it underscored a more fundamental issue: the Lambda function was serving the new images. Lambda is designed for compute; serving static content is a waste of cycles and bandwidth. And since the new images were requested in parallel, the problem was actually worse. The request would either (a) wait for an existing Lambda function to finish, or (b) wait for a new Lambda instance to spin up. Yup, either wait, or wait.
The solution is to use a separate mechanism to deliver static content. These days, it's usually done with a CDN (Content Delivery Network). In fact, Bootstrap publishes their default CSS and JavaScript files to CloudFlare's CDN; many sites use the published version to avoid having the user download them from their own sites. However, CDN's cost money (including Amazon's CDN, CloudFront). As I discussed in my first blog post, I was looking to host my site as cheaply as possible.
So instead, I used API Gateway and S3 as a kind-of low-cost CDN. The technique involves setting up resources in API Gateway to forward the requests for static content to an S3 bucket, instead of the Lambda function. I covered this in detail in a couple of previous posts, where I created a dist resource to map to the wwwroot/dist folder (first manually and then via CloudFormation).
My newly created images were stored in the wwwroot/images folder. All I needed to do was create another API Gateway resource for the static images, right? Well... yes, but there was a little more to it than that.1
I actually had two resources set up for static content: one for the dist folder, and one for blog images. This is what it looked like in API Gateway:
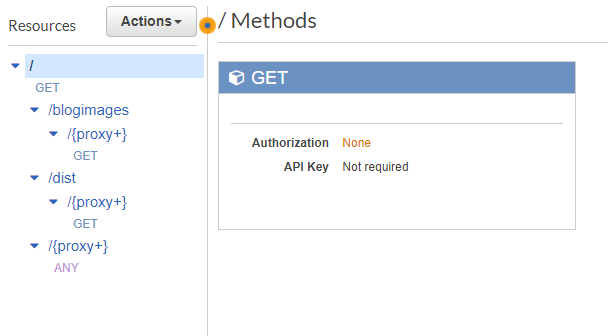
And this is how it looked inside my CloudFormation template. For the sake of brevity, I've only included the resources and the type properties. (Also, the resources appear in a different order than they do in the screenshot, but this is the same order as they appear in the actual file). Note that it takes three CloudFormation resources to fully implement a single "folder" in API Gateway, and that's assuming permissions are taken care of:
  TheGatewayRestAPI:
    Type: 'AWS::ApiGateway::RestApi'

  # This is the top-most GET method, under the root resource
  TheRootGetMethod:
    Type: 'AWS::ApiGateway::Method'

  # These two correspond to the /{proxy+} method at the bottom of the screenshot
  TheProxyResource:
    Type: 'AWS::ApiGateway::Resource'
  TheProxyAnyMethod:
    Type: 'AWS::ApiGateway::Method'

  # These describe the /dist resource
  TheDistResource:
    Type: 'AWS::ApiGateway::Resource'
  TheProxyResourceUnderTheDistResource:
    Type: 'AWS::ApiGateway::Resource'
  TheGetMethodForTheProxyResourceUnderTheDistResource:
    Type: 'AWS::ApiGateway::Method'

  # These describe the /blogimages resource
  TheBlogImagesResource:
    Type: 'AWS::ApiGateway::Resource'
  TheProxyResourceUnderTheBlogImagesResource:
    Type: 'AWS::ApiGateway::Resource'
  TheGetMethodForTheProxyResourceUnderTheBlogImagesResource:
    Type: 'AWS::ApiGateway::Method'
I really, really didn't want to copy/paste another set of resources for the images folder. Truthfully, I wasn't comfortable with the existing repetition of the pattern... each one of the GET methods alone was 30 lines long! Fortunately, CloudFormation has a solution for exactly this type of problem: nested stacks.
Stacking In Your Favor
Nested stacks are complete CloudFormation stacks in their own right, but it helps to think of them as reusable, deployable components. For this particular problem, I wanted to encapsulate each of the three CloudFormation resources (resource, proxy resource, and GET method) into a single entity. All that was different in each case was the folder name and the corresponding S3 bucket location.
Below is the complete template for the nested stack. It was fairly straightforward to write, but it turns out that I needed a fourth resource -- an IAM role that allows the API Gateway resource to read from the S3 bucket. For fun, I included an optional parameter that lets the caller specify a different content expiration header. The actual file is named deploy/cf-apiGatewayToS3.yaml.
AWSTemplateFormatVersion: 2010-09-09

Description: 'Creates an API Gateway resource that forwards GET requests to a folder inside an S3 bucket'

Parameters:
  RestApiIdParameter:
    Type: String
    Description: Id of the API Gateway

  ParentResourceIdParameter:
    Type: String
    Description: Id of the parent resource, typically the root resource id

  ApiResourceNameParameter:
    Type: String
    Description: Name of the resource path to use

  S3BucketPathParameter:
    Type: String
    Description: S3 Bucket and path where static content is located

  MaxAgeParameter:
    Type: Number
    Description: 'Value of max-age in the returned cache-control header'
    Default: 31536000


Resources:
  TheIAMReadOnlyRole:
    Type: 'AWS::IAM::Role'
    Properties:
      AssumeRolePolicyDocument:
        Version: 2012-10-17
        Statement:
          - Effect: Allow
            Principal:
              Service:
                - apigateway.amazonaws.com
            Action:
              - 'sts:AssumeRole'
      Policies:
        - PolicyName: CloudwatchWriteOnlyAccess
          PolicyDocument:
            Version: 2012-10-17
            Statement:
              - Effect: Allow
                Action:
                  - 'logs:CreateLogGroup'
                  - 'logs:CreateLogStream'
                  - 'logs:PutLogEvents'
                Resource: '*'
        - PolicyName: S3ReadOnly
          PolicyDocument:
            Version: 2012-10-17
            Statement:
              - Effect: Allow
                Action:
                  - 's3:Get*'
                  - 's3:List*'
                Resource: !Sub 'arn:aws:s3:::${S3BucketPathParameter}/*'

  TheApiGatewayResource:
    Type: 'AWS::ApiGateway::Resource'
    Properties:
      RestApiId: !Ref RestApiIdParameter
      ParentId: !Ref ParentResourceIdParameter
      PathPart: !Ref ApiResourceNameParameter

  TheProxyResourceUnderTheApiGatewayResource:
    Type: 'AWS::ApiGateway::Resource'
    Properties:
      RestApiId: !Ref RestApiIdParameter
      ParentId: !Ref TheApiGatewayResource
      PathPart: '{proxy+}'

  TheGetMethodForTheProxyResourceUnderTheApiGatewayResource:
    Type: 'AWS::ApiGateway::Method'
    Properties:
      RestApiId: !Ref RestApiIdParameter
      ResourceId: !Ref TheProxyResourceUnderTheApiGatewayResource
      HttpMethod: GET
      AuthorizationType: NONE
      RequestParameters:
        method.request.path.proxy: true
      MethodResponses:
        - StatusCode: 200
          ResponseParameters:
            'method.response.header.Timestamp': true
            'method.response.header.Content-Length': true
            'method.response.header.Content-Type': true
            'method.response.header.Cache-Control': true
      Integration:
        Type: AWS
        IntegrationHttpMethod: GET
        Credentials: !GetAtt TheIAMReadOnlyRole.Arn
        Uri: !Sub arn:aws:apigateway:${AWS::Region}:s3:path/${S3BucketPathParameter}/{fullpath}
        PassthroughBehavior: WHEN_NO_MATCH
        RequestParameters:
          integration.request.path.fullpath: 'method.request.path.proxy'
        IntegrationResponses:
        - StatusCode: 200
          ResponseParameters:
            'method.response.header.Timestamp': 'integration.response.header.Date'
            'method.response.header.Content-Length': 'integration.response.header.Content-Length'
            'method.response.header.Content-Type': 'integration.response.header.Content-Type'
            'method.response.header.Cache-Control': !Sub "'public, max-age=${MaxAgeParameter}'"

Outputs:
  ApiGatewayResourceId:
    Description: The Id of the newly created Gateway Resource
    Value: !Ref TheApiGatewayResource
Including this template in the main CloudFormation template was also straightforward. You can see all the changes necessary in commit dcb6558, but here's the section where the nested stack template is used. I've kept the abbreviated forms of the original resources, but included the full versions of the nested stacks:
  TheGatewayRestAPI:
    Type: 'AWS::ApiGateway::RestApi'

  # This is the top-most GET method, under the root resource
  TheRootGetMethod:
    Type: 'AWS::ApiGateway::Method'

  # These two correspond to the /{proxy+} method at the bottom of the screenshot
  TheProxyResource:
    Type: 'AWS::ApiGateway::Resource'
  TheProxyAnyMethod:
    Type: 'AWS::ApiGateway::Method'

  # Now there is just one entry for each of the API Gateway resources
  TheDistResourceStack:
    Type: 'AWS::CloudFormation::Stack'
    Properties:
      TemplateURL: !Sub 'https://${S3BucketForCodeParameter}.s3.amazonaws.com/${S3BucketPathForStaticFilesParameter}/cf-apiGatewayToS3.yaml'
      TimeoutInMinutes: 10
      Parameters:
        RestApiIdParameter: !Ref TheGatewayRestAPI
        ParentResourceIdParameter: !GetAtt TheGatewayRestAPI.RootResourceId
        ApiResourceNameParameter: dist
        S3BucketPathParameter: !Sub '${S3BucketForCodeParameter}/${S3BucketPathForStaticFilesParameter}/dist'

  TheBlogImagesResourceStack:
    Type: 'AWS::CloudFormation::Stack'
    Properties:
      TemplateURL: !Sub 'https://${S3BucketForCodeParameter}.s3.amazonaws.com/${S3BucketPathForStaticFilesParameter}/cf-apiGatewayToS3.yaml'
      TimeoutInMinutes: 10
      Parameters:
        RestApiIdParameter: !Ref TheGatewayRestAPI
        ParentResourceIdParameter: !GetAtt TheGatewayRestAPI.RootResourceId
        ApiResourceNameParameter: blogimages
        S3BucketPathParameter: !Sub '${S3BucketForCodeParameter}/${S3BucketPathForBlogImagesParameter}'
Now adding the resource for wwwroot/images is a lot easier:
  TheImagesResourceStack:
    Type: 'AWS::CloudFormation::Stack'
    Properties:
      TemplateURL: !Sub 'https://${S3BucketForCodeParameter}.s3.amazonaws.com/${S3BucketPathForStaticFilesParameter}/cf-apiGatewayToS3.yaml'
      TimeoutInMinutes: 10
      Parameters:
        RestApiIdParameter: !Ref TheGatewayRestAPI
        ParentResourceIdParameter: !GetAtt TheGatewayRestAPI.RootResourceId
        ApiResourceNameParameter: images
        S3BucketPathParameter: !Sub '${S3BucketForCodeParameter}/${S3BucketPathForStaticFilesParameter}/images'
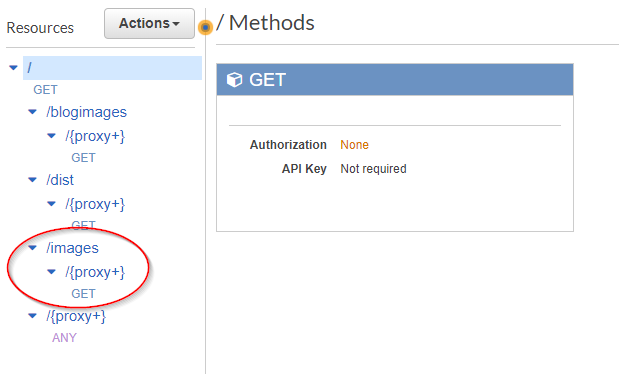
And just like that, the new resource is created:
The Gotchas
Implementing the nested stack was a lot easier than I had anticipated. Nevertheless, I did run into a couple of, um... lessons learned:
Updating a stack is way different than creating a stack
This is one of those things that I'm sure every experienced CloudFormation developer has learned, but it bears repeating: updates are not the same as creates. Make sure you have a way to test your stack updates. In my case, it was easy to spin up a brand new stack and test my update on the newly-created stack. But even then, I tested in all three of my "real" environments (dev, staging, and production).
You cannot replace a logical resource with a different type.
Originally, I had planned to use the same logical name for the nested stack as I did for the API Gateway resource (TheDistResource, etc.). Unfortunately, there's a problem with that approach -- you cannot replace a logical resource with a completely different type. In my first attempt, when I used TheDistResource as the name of the nested stack, I got an error because TheDistResource already existed as an ApiGateway resource. Thus, I chose a different name (TheDistResourceStack) for the new resources.
I still had to manually delete the resources inside API Gateway.
Even after the logical ID change, I still ran into an issue when I deployed the stack. When AWS created the first nested stack (TheDistResourceStack), it attempted to create an API Gateway resource named /dist. Even though the logical ID was different, it still could not create the resource because the actual /dist resource was still present inside API Gateway!
Unfortunately, there is no way to tell CloudFormation to delete certain resources first. You either have to explicitly delete the resources first, or create an interim version of the template that has the old resources removed. Each situation is different. I decided that manually deleting the /dist and /blogimages resources was good enough, since I didn't have significant traffic. But even if I did, the worst that would happen was that the blog images wouldn't load for a few seconds. More importantly, I knew this ahead of time because I had tested it in my dev and staging environments.
Never delete nested stacks manually.
AWS even warned me about it, but I still learned the hard way. (Thankfully, it was only in my dev environment. After all, it ain't my first rodeo.) If you manually delete a nested stack, AWS will no longer be able to apply updates to the root stack, since it cannot compare differences in the stack that has been deleted. I wound up having to delete and re-publish my entire dev stack. Had this been Production, it would have translated into a real outage for a minute or so... embarrassing for me, but disastrous had this been an actual commerce site. The proper way to delete a nested stack is to remove the nested stack from the root stack's template, and then update the root stack with that template.
-
I could have simply duplicated the
distresource and been done with it, but I chose to improve the system instead. I always present this kind of problem as an interview challenge. I'm more interested in why the candidate chooses one approach over the other... their answer, plus the ensuing discussion, will almost always tell you what you need to know about the candidate.↩