Grinding by Hand
How to Manually Build an ASP.NET Core Application and Push It to AWS Lambda
by JamesQMurphy | June 5, 2019
In this post, I'll explore the differences between builds and deployments. I'll also walk through the steps of manually deploying the ASP.NET application to AWS Lambda. The exact version of the source code is available in GitHub as Release 0.0.4. I almost always create a release when I push code to the master branch (and my goal is to have that process automated). This way, I can link an article to the exact version of the code that I used, and you can follow along at home.
Some people get confused by the terms build, release, and deployment. There have been times when a developer has reported that "a build has failed." Naturally, I open up whatever automated build system is being used (Jenkins, TeamCity, etc.), only to find that the build was successful. Of course, I know where to look next; the deployment system (Octopus Deploy, Release Pipelines, etc.). Sure enough, it was a deployment that had failed, not the build. The confusion is understandable for a number of reasons:
- In many cases, the same system does both jobs, whether or not it was designed to do it. Azure DevOps is an example that properly supports both functions (it supports build pipelines as well as release pipelines). Other systems can support both types of activity, but they really shouldn't (more on that in a bit).
- Some developer tools offer deployment functions built right in, which causes developers to equate the functions of building and deploying. For example, Microsoft offers developers the ability to deploy a web application straight to Azure from within Visual Studio. That's great for proof-of-concept and prototyping work, but it's horrible for a continuous-integration pipeline.
- The word "build" can be used as either a verb ("the code did not build") or a noun ("the build is broken"). This encourages overuse of the word which can lead to confusion ("deploy the latest build to production" instead of "deploy the latest version to production"). The word "release" has the same issue.
To help ease the confusion, I explain it like this: There is a one-to-many relationship between builds and releases. Consider this diagram:
The build system has one primary job: Build the software. Its primary output, which is called an artifact, is a deployable version of the software. The software may (and probably does) need to be configured, but the build system does not configure the software (although it can make it config-able). Note how the build system knows nothing about environments --- not even Dev. The build system can also execute secondary jobs, such as running unit tests, performing code analysis, publishing help files, etc., but these activities are also done once per version.
The deployment system, on the other hand, has a different job: Take the software and deploy it to a given environment (Dev, QA, Test, Staging, Production, etc.). Deployment usually involves copying some version of the software to an environment and performing whatever configuration is necessary for that environment. This can be done any number of times; in fact, the goal is to make it as repeatable as possible.
In a previous article I demonstrated how dotnet publish is the primary mechanism for building and packaging a .NET Core application. When you run dotnet publish, you get a folder that contains everything your application needs to run in the target environment, minus any environment-specific configuration. In that post, I demonstrated how I can run the application on both my Windows PC and on my wife's iMac. I could also take the application as-is and run it in Microsoft Azure. But deploying it to AWS (and specifically, AWS Lambda)? That requires a little more work --- and a few code changes.
Deploying The Web Site To AWS Lambda
AWS Lambda is part of Amazon's Serverless Compute platform. A Lambda function is a function, in the sense that it takes inputs and returns an output. That's all. It's not a server platform. You can't send HTTP requests to it, at least not directly. Fortunately, Amazon has created a NuGet package that bridges that gap. The package Amazon.Lambda.AspNetCoreServer, along with its dependencies, allows you to host an ASP.NET Core application as a Lambda function. You still send inputs to the Lambda function, but these inputs are repackaged as HTTP requests and fed directly into the ASP.NET Core pipeline. Amazon has a blog post explaining this in greater detail.
So I added the following packages to my project file:
<ItemGroup>
  <PackageReference Include="Amazon.Lambda.AspNetCoreServer" Version="3.0.4" />
  <PackageReference Include="Amazon.Lambda.Core" Version="1.1.0" />
  <PackageReference Include="Amazon.Lambda.Serialization.Json" Version="1.5.0" />
  <PackageReference Include="Microsoft.AspNetCore.App" />
  <PackageReference Include="Microsoft.AspNetCore.Razor.Design" Version="2.2.0" PrivateAssets="All" />
</ItemGroup>
I also needed to set up a special public class that actually receives the Lambda function calls. This class in turn calls the regular ASP.NET Core Startup class and passes the Lambda function call into the ASP.NET Core application. By convention, the class is called LambdaEntryPoint, but it can really be anything you want it to be. I decided to follow the convention:
using Microsoft.AspNetCore.Hosting;

namespace JamesQMurphy.Web
{
    public class LambdaEntryPoint : Amazon.Lambda.AspNetCoreServer.APIGatewayProxyFunction
    {
        protected override void Init(IWebHostBuilder builder)
        {
            builder.UseStartup<Startup>();
        }
    }
}
We're almost ready to try it, but there's one more catch. Read on.
Setting Up the Lambda function
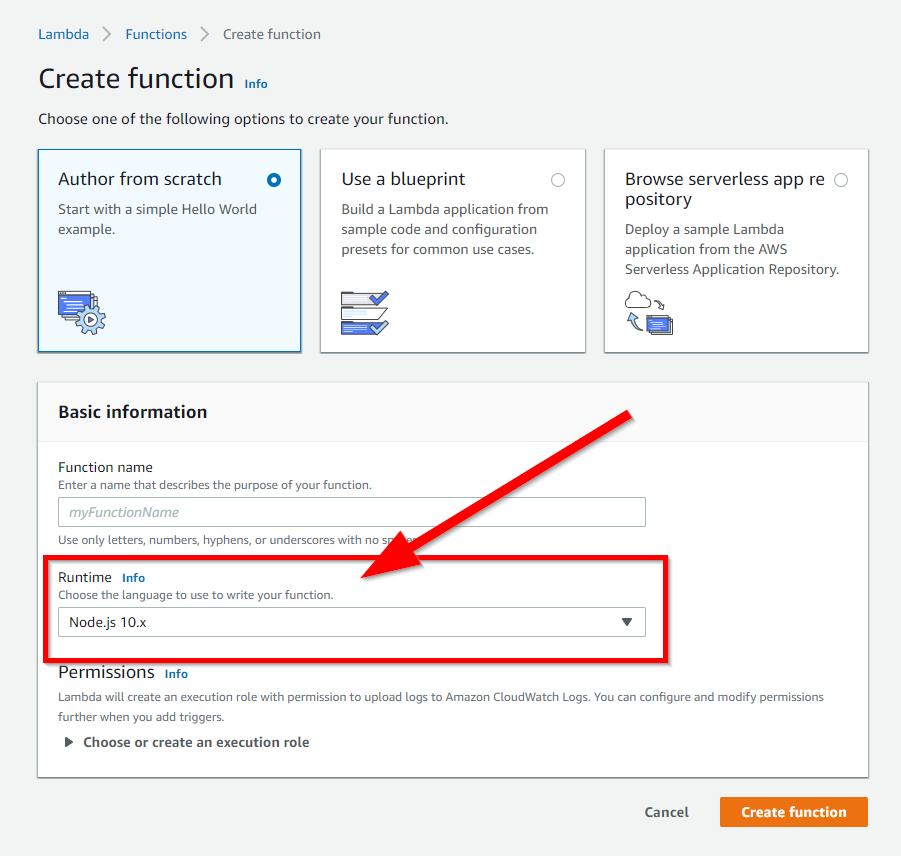
To set up the Lambda function manually, I logged into the AWS Console and selected "Lambda". Once here, I clicked on the "Create Function" button and was taken to a screen that had a few options for creating Lambda functions. I used the "Author from scratch" option. But take a look at the "Runtime" dropdown, highlighted below:
At the time of this writing, .NET Core 2.2 had been out for six months, and .NET Core 3.0 was in preview. Yet AWS Lambda only offered .NET Core 2.1 and 1.0:
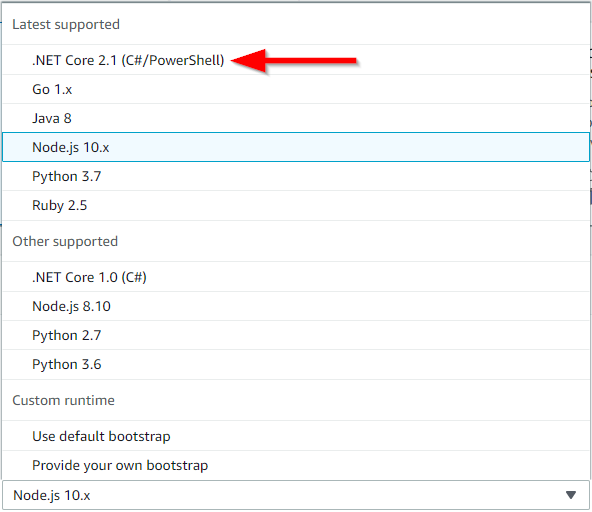
It's great that Lambda supports .NET Core, but it's a bit of a bummer that it's not the latest version. AWS only supports LTS (long-term support) versions of .NET Core in Lambda. There is a workaround, as we shall see in a bit, but I do want to demonstrate how easy it is to implement ASP.NET Core with AWS Lambda using the built-in runtime. So temporarily, I downgraded the project to ASP.NET Core 2.1:
<PropertyGroup>
  <TargetFramework>netcoreapp2.1</TargetFramework>
  <!-- Remove the <AspNetCoreHostingModel> element -->
</PropertyGroup>
There's also this line in Startup.cs:
services.AddMvc().SetCompatibilityVersion(CompatibilityVersion.Version_2_1);
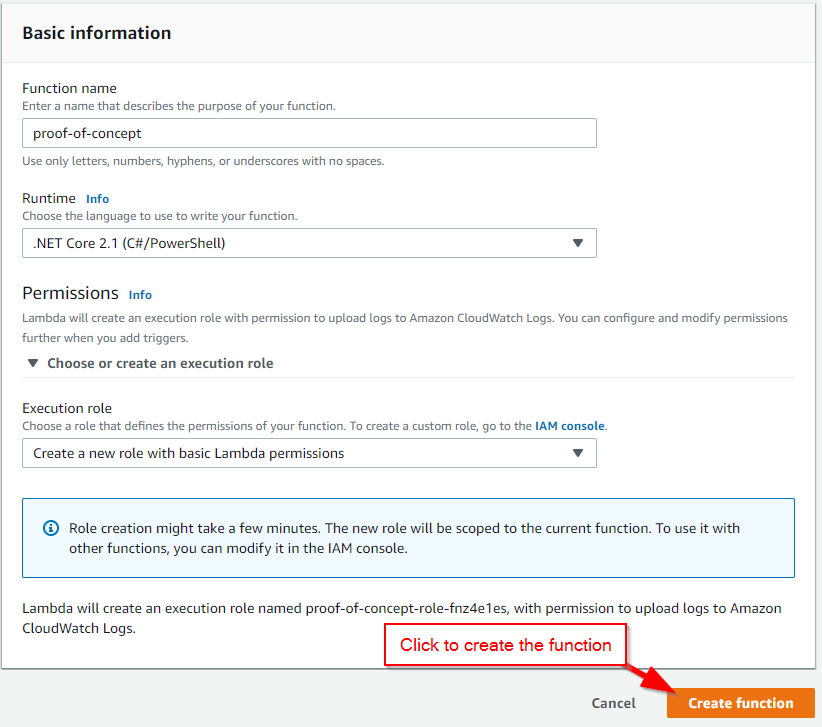
I re-ran dotnet publish -c Release to rebuild the website. We'll see how to get the code up to AWS in a moment. Back in the AWS Console, I created a Lambda function named "proof-of-concept", specifying .NET Core 2.1 as the runtime. I also selected the default option to create a role with basic Lambda permissions, which will suffice for now, but is not what you want to do in a production system. I'll cover how to properly set up AWS Roles in a future post.
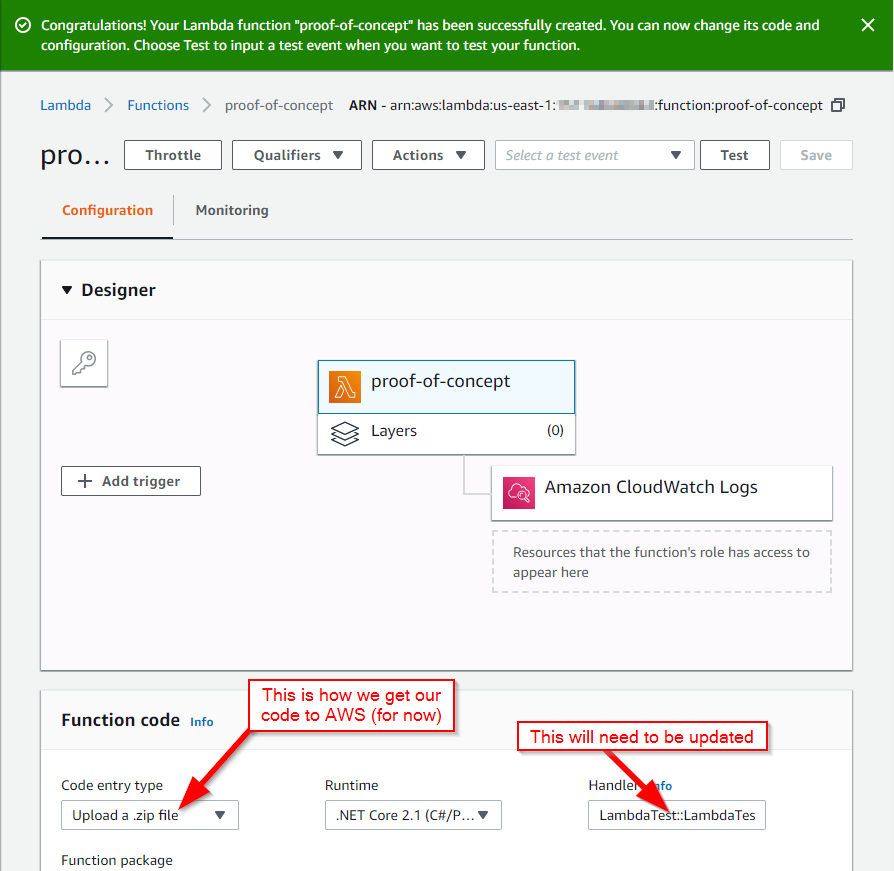
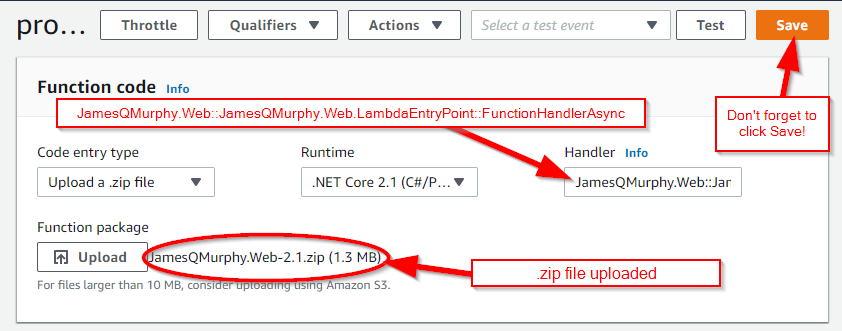
Once the function is created, I was greeted with the screen below. The "Function code" section listed the options for getting the code to AWS Lambda:
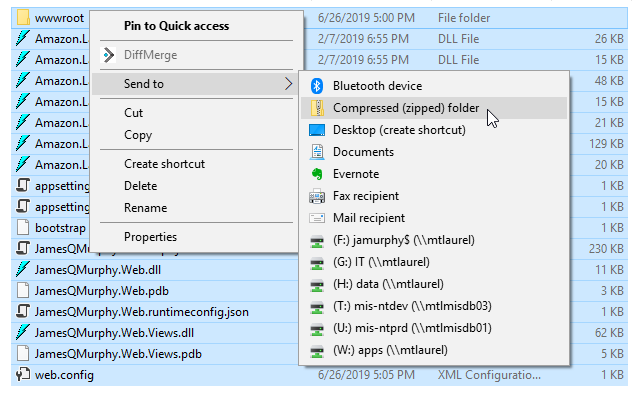
Simple, right? Just zip up the Publish folder and upload, right? Well, not really. You need to zip the contents of the Publish folder. In other words, if you're going to do it from Windows Explorer, don't do this:

Instead, select the contents inside the folder, like this:
One other thing to point out. There is a field named "Handler" on the Lambda screen. This is the class that will actually be called by AWS Lambda; for the built-in .NET Core runtimes, AWS does not call your Main method. Instead, it calls the method specified in this field, which is a method defined in the LambdaEntryPoint class. It is formatted like this:
Assembly Name::Class Name::Method Name
which in this our case is:
JamesQMurphy.Web::JamesQMurphy.Web.LambdaEntryPoint::FunctionHandlerAsync
Putting it together, the configuration looks like the image below.
Testing the Lambda Function
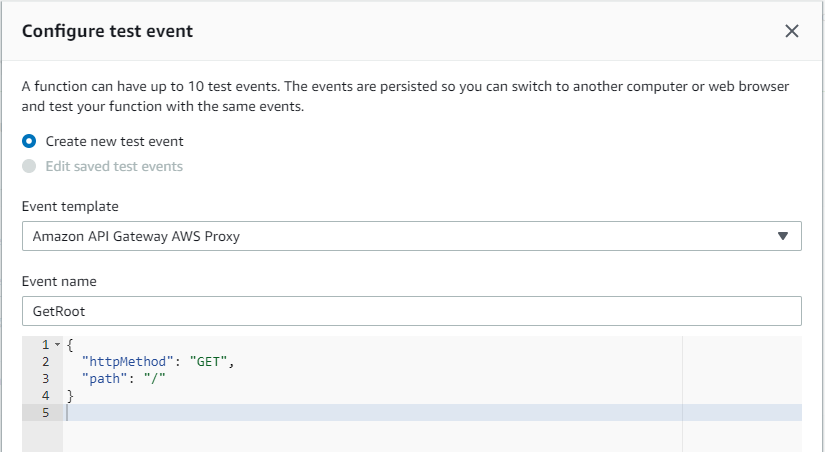
The web interface for AWS Lambda functions has a built-in test harness. Setting up a test to invoke the ASP.NET Core Web Application is straightforward. At the top of the page, I clicked "Configure test events":

AWS has dozens of templates to choose from. Since the Lambda function will be called from AWS API Gateway, that's the one I selected. The default test event has lots of properties to configure, but here is the smallest test event that requests the root of the website:
{
	"httpMethod": "GET",
	"path": "/"
}
I named the test event "GetRoot":
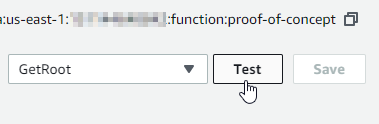
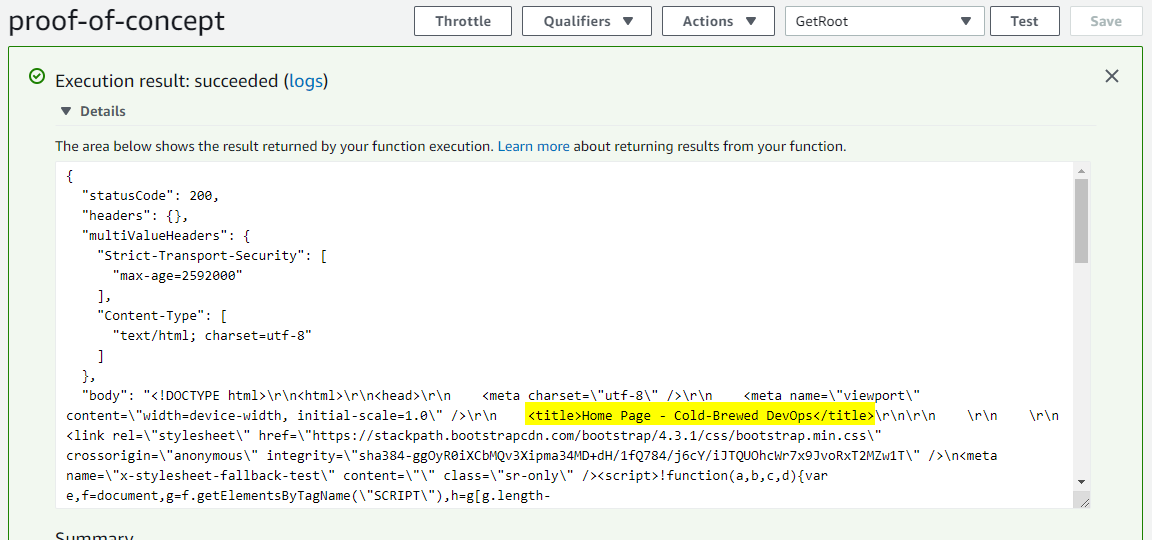
Running the test is as simple as clicking the "Test" button in the upper right corner:
And as shown below, the Lambda function does indeed return the web page. Note how the Lambda function acutally returns a JSON response, but you can see all the elements of a standard HTTP response. In a later post, we'll set up AWS Gateway API to actually return the response over the Internet.
Using Later Versions of ASP.NET Core
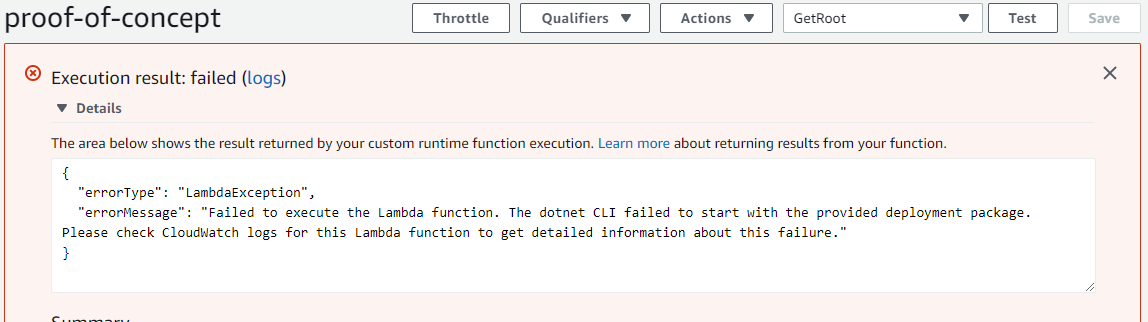
Earlier, I mentioned that AWS only supports long-term support versions of .NET Core. Indeed, when I recompiled the application for ASP.NET Core 2.2, uploaded, and tried the TestRoot test, the application returned an error:
Fortunately, AWS released another package that let's us get around this limitation: Amazon.Lambda.RuntimeSupport. It makes use of AWS Lambda's Custom Runtime feature, which means that you get a bare-bones Linux distribution with no runtimes loaded, which means you are responsible for supplying everything your Lambda function needs. For .NET Core applications, this means the following:
- Applications need to reference the
Amazon.Lambda.RuntimeSupportpackage. - Applications need to be built and published as self-contained applications.
- Lambda needs to know how to launch your application. This is accomplished with a shell script named
bootstrap.
Those steps are straightforward enough, but there's another implication for ASP.NET Core applications. An ASP.NET Core application, when launched normally, is a web server, which means it will start listening for HTTP requests. But AWS Lambda does not receive HTTP requests; it receives Lambda function calls. This means that, for this configuration, we are responsible for translating the Lambda function calls into web requests ourselves.
So, after switching the project back to ASP.NET Core 2.2., I added the new package dependency. My project file looked like this:
<ItemGroup>
  <PackageReference Include="Amazon.Lambda.AspNetCoreServer" Version="3.0.4" />
  <PackageReference Include="Amazon.Lambda.Core" Version="1.1.0" />
  <PackageReference Include="Amazon.Lambda.RuntimeSupport" Version="1.0.0" />
  <PackageReference Include="Amazon.Lambda.Serialization.Json" Version="1.5.0" />
  <PackageReference Include="Microsoft.AspNetCore.App" />
  <PackageReference Include="Microsoft.AspNetCore.Razor.Design" Version="2.2.0" PrivateAssets="All" />
</ItemGroup>
Here are the changes that I made to the Main method in Program.cs. If the application is passed a command-line argument lambda, it will create the necessary AWS classes to listen for Lambda events; otherwise, it starts like every other ASP.NET Core application. Note how we must manually create the LambdaEntryPoint class and reference the FunctionHandlerAsync method:
        public static void Main(string[] args)
        {
            // AWS Lambda will call the "bootstrap" shell script, which
            // will pass the string "lambda" as an argument
            if (args.Length > 0 && args[0] == "lambda")
            {
                var lambdaEntryPoint = new LambdaEntryPoint();

                // This explicit cast is needed with slightly older C# versions
                var lambdaFunctionHandler = (Func<APIGatewayProxyRequest, Amazon.Lambda.Core.ILambdaContext, Task<APIGatewayProxyResponse>>)lambdaEntryPoint.FunctionHandlerAsync;

                var handlerWrapper = HandlerWrapper.GetHandlerWrapper<APIGatewayProxyRequest, APIGatewayProxyResponse>(lambdaFunctionHandler, new JsonSerializer());
                using (handlerWrapper)
                {
                    using (var lambdaBootstrap = new LambdaBootstrap(handlerWrapper))
                    {
                        lambdaBootstrap.RunAsync().GetAwaiter().GetResult();
                    }
                }
            }
            // Otherwise, it gets called like most ASP.NET Core web apps
            else
            {
                CreateWebHostBuilder(args).Build().Run();
            }
        }
Finally, we need a shell script named bootstrap that will get executed by AWS Lambda. Notice how I pass "lambda" as a command-line parameter to the application:
#!/bin/sh
# This is the script that the Lambda host calls to start the custom runtime

/var/task/JamesQMurphy.Web lambda
The resulting call to dotnet publish looks like this. Note the extra parameters --self-contained and --runtime rhel-x641 to publish a self-contained version.
dotnet publish -c Release --self-contained --runtime rhel-x64
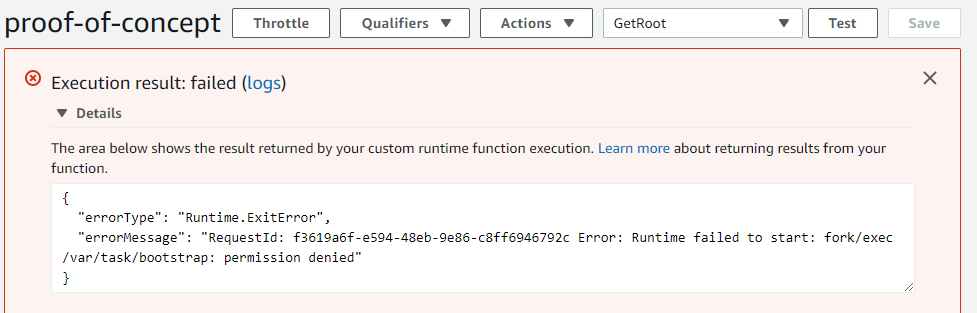
The build worked, and it's worth noting that the resulting zip file swelled to almost 40MB due to the inclusion of the .NET Core runtime files. But when I uploaded the zip file to AWS Lambda, I encountered a completely different kind of error: Permission Denied
Unix File Permissions and How Not To Worry About Them
My research into this error turned out to be a wonderful crash course in Unix Permissions (sometimes known as "777" permissions). If you've ever typed ls -al at a Unix (or Linux) prompt, you'll notice a collection of letters and dashes at the front of each file:
drwx------ 10 example example 4096 Jan  1 01:00 directory
-rwxrw-rw- 10 example example 4096 Jan  1 01:00 some-file
The first letter is a simple flag indicating whether or not the entry is a directory, and the following letters indicate read, write, or execute permissions for the owner, the group, and others, respectively. There are plenty of good resources on the web that explain these permissions in greater detail, but the problem essentially boils down to these simple facts:
- AWS requires that your Lambda function files have execute permissions (the "x" letters)
- If you upload your code via .zip file, AWS uses the file permissions inside the .zip file
- In the Linux world, .zip files can contain file permissons (if using the Info-ZIP libraries)
- In the Windows world, they can't.
Initially, I thought I would need to build the package on a Linux machine (either my wife's Macintosh or a Docker container). But fortunately, AWS does provide a way to create the correct type of .zip file, no matter which operating system you are using. Specifically, they offer the dotnet-lambda tool, which is a standard .NET Core Global Tool. The dotnet lambda tool lets you upload code directly to AWS, but it also lets you create a .zip file to be uploaded separately. If you want, you can install the tool by simply entering the following command:
dotnet tool install -g Amazon.Lambda.Tools
And if you don't want to install the tool globally, you can install the tool to a specfic folder and call it directly:
dotnet tool install Amazon.Lambda.Tools --tool-path .\some_folder
Here are the commands I used to create a .zip file. I ran these commands from the root folder of the repository. Note that I still needed to pass in the --self-contained and --runtime flags; the dotnet lambda tool calls dotnet publish under the hood.
dotnet tool install Amazon.Lambda.Tools --tool-path ./tools
./tools/dotnet-lambda package -c Release -pl ./src/JamesQMurphy.Web --msbuild-parameters "--self-contained true --runtime rhel-x64"
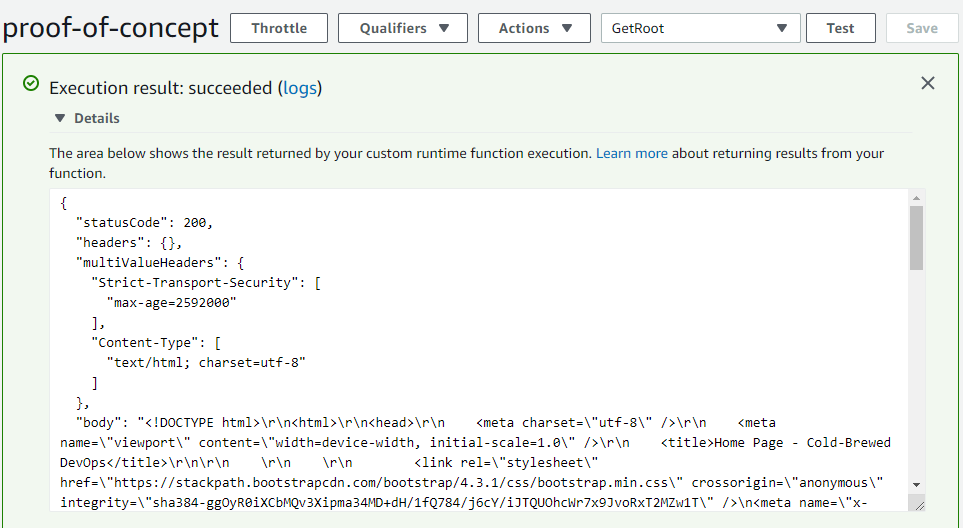
And voila, after uploading the newly published .zip file to AWS Lambda, I had a working ASP.NET Core 2.2 application!
Of course, we're still not there; this is just calling a Lambda function from within the AWS console. The ASP.NET Core application is not returning results to a real browser. We'll tackle that in the next post.
-
The
rhel-x64runtime identifier (RID) indicates a RedHat Enterprise Linux distribution; I noticed this was the runtime that one of the AWS Samples was using. It works, and thankfully, it does not take 11 minutes to publish like the MacOS runtime required!↩